对Hexo的Next主题配置和使用,我还是有一些心得的,无非是各种样式覆盖一下,逃:)
添加RSS
首先在博客根目录安装hexo插件:
1 | $ npm install --save hexo-generator-feed |
npm安装失败请用cnpm
然后在博客配置文件_config.yml中修改
1 | plugins: hexo-generate-feed |
然后在主题配置文件_config.yml中修改
1 | rss: /atom.xml |
修改作者头像并旋转
打开\themes\next\source\css\_common\components\sidebar\sidebar-author.styl,在里面添加如下代码:
1 | .site-author-image { |
添加相册
原理很简单,就是建立一个github仓库存储用于存储图片,然后将每个图片的路径保存到一个json文件里,在hexo博客中解析这个json文件,渲染成html页面后就可以在显示图片了。当然这里肯定要有页面的样式和图片的裁剪压缩,原理简单,实际操作起来有一些坑,我并不懂css样式,还是要感谢litten提供的方法。
相册源
- 首先在github上新建一个仓库,命名
Blog_Album clone我的Hexo-Album仓库,改一下文件名为Blog_Album或者其他,记住之后要上传的相片就放到
photos文件夹内。在博客根目录运行
1 | hexo new photo |
回到
Blog_Album文件夹,在make-json.py中96行、98行,修改路径为blog源文件中的photo页面路径。这里后两行打印json的可以不需要。1
2
3
4with open("../Blog_Source/source/photo/" + target_file, "w") as fp:
json.dump(final_dict, fp, indent=4, separators=(',', ': '))
with open("../Blog_Source/source/photo/" + target_file, "r") as fp:
print (json.load(fp))添加一些图片到
Blog_Album的photos文件夹中- 运行compress.py生成图片缩略图到min_photos/
- 运行make-json.py生成json文件到blog源文件中
- 将
Blog_Album的修改传到github远程仓库Blog_Album
上传前可以将Hexo文件夹移出,这个文件夹中的文件在后面还有作用。如果你不用七牛云,也可以将qiniu相关的脚本删掉。
博客相册页
- 回到
yourblog\source\photo目录下,下载这些定义好的photo页面文件,后期你可以自己修改其中内容。
将ins.js中的114行的render()函数需要修改这两个变量,这里是将图片存在github对应的连接,如果是七牛云需要绑定域名了。
1 | var minSrc = 'https://raw.githubusercontent.com/fakeYanss/Blog_Album/master/min_photos/' + data.link[i]; |
如果你的仓库名和我相同,只用把这里的fakeYanss改为你自己的github name即可。
- 在
yourBlog/themes/next/source/js/src下加入两个js文件photoswipe.min.js和photoswipe-ui-default.min.js,都可以在Hexo文件夹中找到。
- 在
yourBlog/themes/next/layout/_scripts/pages/post-details.swig中添加
1 | <script type="text/javascript" src="{{ url_for(theme.js) }}/src/photoswipe.min.js?v={{ theme.version }}"></script> |
- 在
yourBlog/themes/next/layout/_layout.swig中
head内插入
1 | <script src="{{ url_for(theme.js) }}/src/photoswipe.min.js?v={{ theme.version }}"></script> |
body内插入
1 | {% if page.type === "photos" %} |
重新编译博客内容即可看到相册内容。
注意:
- 如果py脚本不能运行,先安装python环境,再安装
Pillow库pip install Pillow - 相册图片的命名请遵循
yyyy-mm-dd_abc.jpg格式,虽然脚本里写了其他格式的处理,但实际情况似乎只能对jpg文件裁剪压缩 - 最后的不足是,相片的裁剪算法,可能会把一张图片中的人体头部裁剪掉
- next主题源码是不支持相册的,如果有不懂的地方,可以看看评论的相似情况,或者查一下yilia主题的issue,然后再来问我
- 相册源文件中处理图片生成json和上传图片的处理,我写了一个releash.sh脚本,可以修改一下,以后添加图片后快捷处理
- 如果py脚本不能运行,先安装python环境,再安装
changelog
2018.2.23修改
发现ios设备拍摄的正方形照片的压缩图上传后仍然有orientation值为6即偏转90度问题,索性修改了整个裁剪切割和生成json的脚本。在压缩同时修改偏转值,并且在生成json时获取图片尺寸,在前端显示图片原图时在data-size中设置json中的对应图片尺寸,这样可以不切割原图,修改后的设置方法在对于修改后的相册的ins.js,需要做一些修改,以适应修改后的脚本生成的json数据,在render()方法中,注意内层
<img>标签为缩略图,<a>标签为原图,在对应的属性处设为对应值。
1 | var minSrc = 'http://pic.yanss.top/min_photos/' + data.link[i]; |
- 2019.3.2修改
由于换了主题hollow,不支持添加页面,所以讲相册独立出来,发到一个github仓库并开启page功能,目前是在https://fakeyanss.github.io/gallery。
并且做了一些修改:
- 不在使用七牛云图床,转到github,毕竟不限流,不限量,慢点就慢点。
- 如果图片的orientaion信息有问题,可以自己修改一下,mac上用Xee³,window上用bandizip家的蜂蜜浏览器,都是打开图片保存一下就好了,直接将orientation值重设为1。
- 修改了一些样式,计划做成Instagram的样式。
添加Gitment评论
原本是用的livere评论,后来总是加载速度太慢,上了梯子也一样,索性改成了Gitment评论。
感谢作者imsun,Gitment评论源自github仓库的issue,所以在将博客地址关联了某个github仓库后,在博客下评论其实就是在对应仓库的issue中评论,这创意真是太好了。
我之前的next主题一直是5.1.0版本,本来是想在主题中添加gitment的js和css文件,结果没成功。然后在next的官方文档中看到已经发行到5.1.4了,而且已经集成了gitment评论。这下可方便,干脆直接升级了next主题,然后就改config文件就好啦。
以前主题中配置了一些设置项,时间久了还忘了改了哪些文件!!!所以升级版本很痛苦,用的Sublime的一个插件Sublimerge,可以对比两个文件的代码差异,就是这样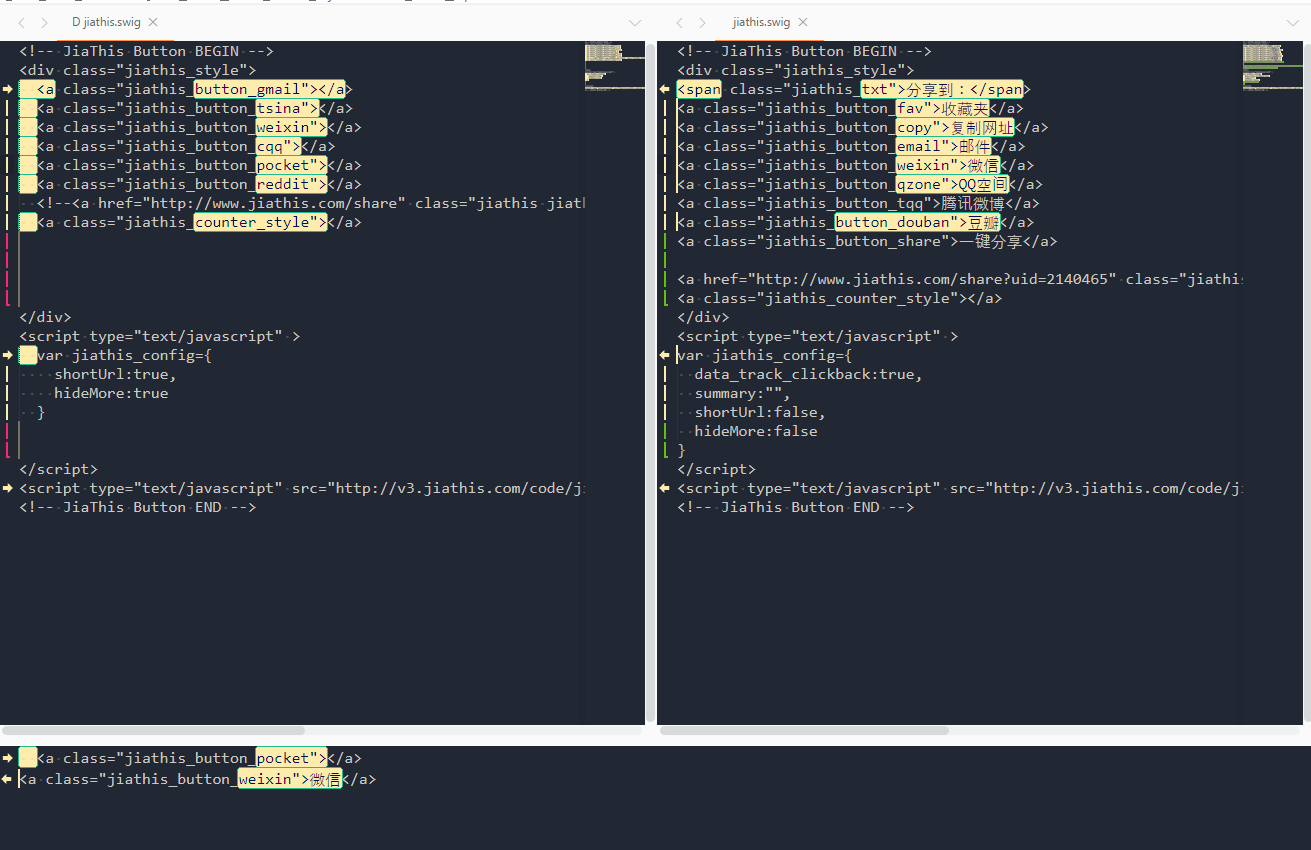
就像git pull操作之后改动时一样,这样子把每个有可能改过的文件都对比了一遍,然后升级到了5.1.4,发现集成了很多新功能,其他的有时间再试吧,这里就只说gitment。
首先在这里注册一个OAuth Application,Homepage URL和Authorization callback URL填写博客首页地址,也就是站点配置文件中的url,其他随意填写即可。
然后会得到一个Client ID和Client Secret,把这两个值填到主题配置文件的gitment对应位置1
2
3
4
5
6
7
8
9
10
11
12
13gitment:
enable: true
mint: true # gitment仓库有两个,这里填true是引用第一个,false引用第二个,具体在layout下的conment文件中可以找到
count: true # 评论计数
lazy: false # 如果要点击按钮再显示评论就填true
cleanly: true # 隐藏底部信息
language: # Force language, or auto switch by theme
github_user: 填github ID
github_repo: 填保存issue的仓库名,一般就用博客发布的仓库名
client_id: 刚才的值
client_secret: 刚才的值
proxy_gateway: # 设置代理,不用填
redirect_protocol: # 没搞懂,不用填
然后重新部署博客(本地调试是没用的,因为url不同),再打开博客,这时候需要在每一个有评论的页面上使用自己的github长航登录并初始化一遍评论,之后就不用了。文章多的话会有点麻烦,不知道gitment作者有没有做好自动初始化?好像查到了这个,不过我还没试过。
这里是成功的样子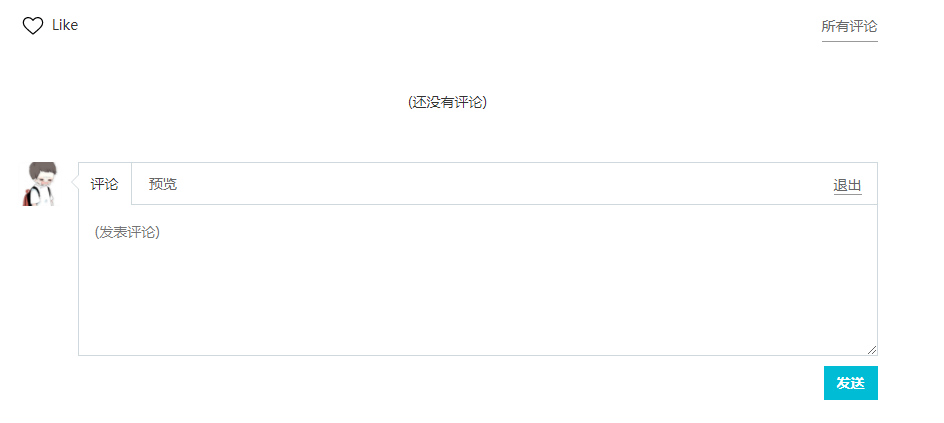
但是,这个鼠标放上有两条横线什么鬼啊!!!
还有这里头像下面为什么有一条横线!!!!
强迫症忍不了,查看了gitment的css定义,没发现什么问题啊,然后在浏览器中调试,发现了这个1
2
3
4
5
6a{
color: #555;
border-bottom: 1px solid #999;
text-decoration: none;
word-wrap: break-word;
}
这里的border-bottom: 1px solid #999就是a标签下有一条横线的意思,但是这个属性是主题的属性main.css啊,显然是不能改的,于是只有在themes\next\source\css\_common\components\third-party\gitment.styl下改动了,在这里可以重写前面定义的属性,我是这样改的,在最后面加上1
2
3
4
5
6
7
8
9
10
11
12.gitment-comment-main a{
color: #555;
border-bottom: none;
text-decoration: none;
word-wrap: break-word;
}
.gitment-editor-avatar{
color: #555;
border-bottom: none;
text-decoration: none;
word-wrap: break-word;
}
第一个就是修改的ID下的横线,显示为none就好了;第二个是修改编辑框头像下的横线,也是显示为none。
这样,算是完成了Gitment的配置了。
gitment已经失效了,看到作者的博客下的评论也失效了,查到似乎是因为gitment中在与github认证时需要作者提供的服务端支持,但是作者的服务端已经停掉了。
我现在转到了disqus。
设置自定义页面不显示Sidebar
主题配置文件中是这样的1
2
3
4
5
6
7toc:
enable: true
number: true
wrap: false
sidebar:
position: left
display: post
讲道理这样就是是没有问题的,但是我发现自定义的页面里如果写了太多的#或者<h1>,就会被识别为post类型而不是page,也就是博客文章,会被自动加载目录,这就很蛋疼了不是,毕竟有的页面不想要目录啊尴尬!!!
一般这种样式问题都在
layout文件夹中找原因。
在themes\next\layout\_macro\sidebar.swig,找到开头的1
2
3
4
5
6
7
8{% macro render(is_post) %}
<div class="sidebar-toggle">
<div class="sidebar-toggle-line-wrap">
<span class="sidebar-toggle-line sidebar-toggle-line-first"></span>
<span class="sidebar-toggle-line sidebar-toggle-line-middle"></span>
<span class="sidebar-toggle-line sidebar-toggle-line-last"></span>
</div>
</div>在下面加上1
{% if page.toc and theme.toc.enable %}
然后在倒数第二行加上1
{% endif %}
发现这样修改有bug,重新改。在themes\next\layout\_macro\sidebar.swig找到这一句1
{% set display_toc = is_post and theme.toc.enable or is_page and theme.toc.enable %}
改为1
{% set display_toc = is_post and theme.toc.enable or is_page and page.toc or is_page and theme.toc.enable and page.toc %}
其实就是多加一个判断,判断页面的开头有没有toc属性
最后,在需要有sidebar目录的文章前加上toc: true即可。
为了以后的方便,可以在scaffolds\post.md中加上toc: true。